Showing posts with label Fridays. Show all posts

Friday, February 14, 2014

Food Friday: Tamagoyaki-style Omelets

I must admit: I love the food of other cultures. I will admit that I often try to copy especially Japanese or Chinese cuisine, and typically do so badly. While the idea of a culinary “Tour of Italy” to examine the differing culinary regions of that culture intrigues me, I would love to take a tour of all the differing food regions of China. Then follow it up with a short trip through Japan, and a stopover in Korea.

So, when I see ideas from an Asian cuisine that I’ve never seen, I tend to chase them down. Then, when I learn a little more, I either abandon them or try it out. Today, I am going to hit one that I tried out, and so far seem to be doing okay with: the Tamagoyaki. Now, as I titled this, I will call my work a tamagoyaki-style omelet, because it’s not completely inline with Japanese tradition.

What is a tamagoyaki? It’s basically an omelet, but instead of a fold like you might expect, it’s a rolled omelet. The word tamagoyaki allegedly means “Grilled Egg,” but my Japanese is very, very bad. It could mean “food that goofy American man thinks is Japanese but we don’t eat it.”2014-01-27 07.45.15

As a rolled omelet, you can add fillings and such to it, but it’s mainly about the egg. Here’s a picture of one of mine:

See how you have the layers? That’s the idea.

The recipe concept is simple. I’m going to link a video at the bottom where there is a more authentic recipe, but I’m all about the simple, and that’s what I’m going to give you. Here are your ingredients:

3 eggs at room temperature

vegetable oil

salt & pepper to taste

cheese optional

What? You wanted more? I like a specialized piece of equipment for this. It’s called a Tamagoyaki Pan. I got one for Christmas, and it looks like this:

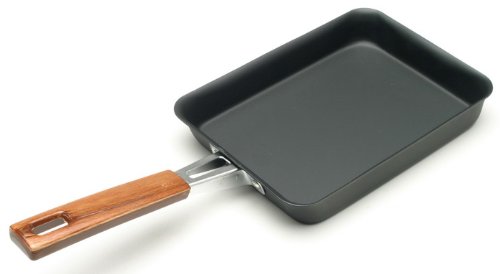
It’s a rectangular pan, about 7 inches long and 5 inches wide. That’s it. I use mine almost every morning these days. Here is the basic process:

1. I get up, I set 2 or 3 eggs out to warm up toward room temperature. (Health experts, go away.) Out of laziness, usually I just put them in the pan, still in the shell. Then I go shower, etc…

2. I take the eggs out of the pan, and preheat the pan while scrambling the eggs in a bowl. I have found that using my larger electric burner works better. It’s a 7 inch diameter burner, so there is wasted space on the sides, but it heats the whole pan evenly.

3. Into the heated pan, I put a little bit of vegetable oil. Not much! Just enough that, when heated, puts a light coating on the whole pan. You’re out to cook the eggs with pan-heat, not fry them with oil-heat.

4. Eggs are scrambled, the pan is hot, so I pour just enough egg into the pan that it covers the whole pan very thinly. Think: pour egg into one spot, then tilt pan to make the eggs run across the surface. I use a silicone spatula to flatten them in well.

5. Now comes the fun part: flavor! As that first layer is getting done, salt and pepper it. Add some cheese across it if you like—or put a cheese stick at the far end of the pan (away from the handle).

6. Roll the eggs from the far end back to you. You’re creating a spiral. Then, slide the rolled-up egg to the far end.

7. Repeat the egg pour-in. Tilt the pan to get some egg under the roll at the end. As it is getting done, you can season or not season it, depending on your preference. I have done cheese in one roll, ham in the next for a ham and cheese omelet.

8. Repeat the roll and slide maneuver. I find that 3 eggs is my limit, by the way, for manageable size. That results usually  in 4 pours, but sometimes 5. Frequently, I do 2 eggs and that’s 3 pours.

2014-01-26 07.33.319. Once you’ve gotten all of your eggs cooked and rolled up, you have something that really looks like a burrito. See?

10. Let it sit in the pan, taken off the heat, for about 2 minutes. (Or time it like I do—how long does it take to pour the coffee?) Then, on to the plate for serving or the board for cutting. You can cut into multiple slices 2014-01-27 07.45.10for easy eating, or just do what we do: cut it in half for perfect sharing.

That’s breakfast. The taste is just different enough—and you can layer in various items if you want to. Ours are frequently just one slice of cheese to the 3 eggs, with pepper and salt.

It’s quicker than it sounds—but it takes some practice. Come on over sometime and we’ll split an omelet!

Now, I’ll give you what you need: a video from a professional. This is what I watched to figure out how to do this from—he uses cooking chopsticks, and I have not mastered that yet.


And he made little hearts…

Friday, February 7, 2014

Food Friday: Skillet Steak, Edamame, Green Beans.

My first installment for Food Friday is based on the recipes that Ann and2014-01-17 19.33.26 I learned at Table for Two a few weeks back. So, all the original and better ways to do this come from Executive Chef Robert Hall from the Rockefeller Institute. When you do it with Chef Hall watching for mistakes, it comes out looking like this:

Of course, if you’re reading about food on this blog, you likely cannot hire an executive chef for your daily cooking. You want a home tip or two.

Here is how we worked this out at home.

First, of course, when you cook you have to think through ingredients and tools. Nobody with any real sense buys new pots, pans, or kitchen tools every week for new meals. You purchase multi-taskers as you find a need for them. Fortunately, this particular meal requires a couple of things that should be standard in your kitchen. You need:

  • A cast iron skillet.
  • Another skillet or saute pan. I used a 10-inch stainless steel for this recipe.
  • A set of tongs. We have some tongs that are silicon-covered aluminum tips. They work great for this type of thing.


Ingredients? Of course you need ingredients. Here’s the catch for me: I can shop at a local Wal-mart, occasionally a local farmer’s market that doesn’t have much, and at a Kroger but it’s inconvenient to get to. My goal is generally to make one stop and get everything, so we are not looking at the fanciest of supply chains.

To cook what we ate will take:

  • Steak. I found thin cut strip steaks with a yellow price that week, so they were cheaper.
  • Green beans: you can buy fresh and blanch them, or you can buy frozen ones and use them straight up. Fresh is better, but we used frozen, “French” green beans. You’re after the skinny ones, not the fat ones.
  • Edamame: there’s a shelled edamame in the freezer section at Walmart. These are optional, but they are a good texture addition.
  • Some fresh mushrooms, sliced.
  • Butter, garlic, rosemary, salt, pepper. Obviously, fresh garlic and rosemary are nice, but you do what you can. Butter: we’re starting to shift to unsalted butter at Chef Robert’s instruction, but I think we used some of the salted in the freezer for this.

Now, on to process. First thing first: wash your hands. That should go without saying, but I said it anyway.2014-01-24 18.58.04

Next: get the meat out on the counter, let it start rising to room temperature. Putting a little salt on it will not hurt right now.

While those are warming, you may choose to cover them loosely with a paper towel to keep from bumping them. Remember: raw meat should not come in contact with ready-to-eat stuff. These got salted and then set out of the way.

At this point, the next step is to put the cast iron skillet on the burner. Since I’m working on a flat-top electric range, I put it on at medium and let it sit there. It’s on the back burner, getting hot. Say it with me, though: Children, don’t touch the hot pan. It will burn you, and you will cry.

If your pan is well-prepped, you can let it get hot while you work on other tasks. If it smokes too much, turn the heat down. If it bursts into flames, get out.

2014-01-24 18.57.58

(See the set up?)

Now, you want to start melting your butter in the other skillet. This is two tablespoons of butter and a splash of vegetable oil. Keeps the butter from burning, or so I’m told.

I put that on a medium high for it to melt. Then, we turn our attention to the target of all the heat. Remember, your steaks are sitting out of the way, getting ready to be seared up nicely.

You need to gather your vegetables. I chose a mix of mushrooms, edamame, and green beans. 2014-01-24 18.58.09

(That’s them in the bowl.)

Once the butter is melted and there’s a bit of foaming in the skillet, I added some rosemary and some garlic. Mixed that up, and then cautiously dumped that bowl into the butter/herb mixture. This gets stirred around for a couple of minutes.

At the same time this is happening, your cast iron should be hot. In fact, you should check your iron skillet for warmth before you dump your vegetables into the steel skillet. If it’s good and hot, then go ahead and lay your steaks down into the skillet. They should sizzle and stick.

Good.

Leave them alone. Seriously. Let them stick right there for a couple of minutes. Once they have seared on that edge, guess what? They will let go of the pan. You should find the timing to be somewhere between 3 and 5 minutes.

Or about the same amount of time you will need to stir and saute your vegetables. Turn off the heat to the veggies, and then flip your steaks. If they let go easily, they’re cooked on that side.

Once they hit the heat (I found it helpful to lay them where they had NOT been laying, as best possible, for heat), put a tablespoon or two of butter and some garlic, and put it in the skillet between the steaks. (I was cooking 2 at a time.) At this point, if two steaks is your goal, you can actually shut off the heat, especially on an electric range. There’s enough heat there to finish off.

As the steaks sit for about the same time on that side as the prior side, the butter will melt, and the flavor of the garlic with the butter will stick to the steak. When it lets go of the pan, take it out and put it on a plate. Or, pull it up, flip it, and put a lid over the pan to move it to “well-done,” but I’m a medium guy.

2014-01-24 19.08.38

This is how it looked when it was about finished. I don’t have a completed project picture.

If you plate the steak, then put the vegetables beside it, the meat will have time to rest. ALWAYS LET THE MEAT REST!

Unless you like it to loose its juice, that is.

This a great meal. I would say I used a bit too much butter on the vegetables, but otherwise it was excellent. Of course, add salt or pepper to taste. Especially a good pepper to the steaks before they hit the pan. Ours took 4 minutes a side and you could cut them with a simple table knife. The beans-edamame-mushrooms were a great side.

What do you think? Going to try it? Or coming over and doing it with us some night?

Friday, January 31, 2014

Food Friday: January 31

I am thinking of starting up a different intermittent series here on the old blog. Why? Because it’s my blog. And I have come to this conclusion: there’s no reason for me to always be serious or selling on here. And that’s what I do a lot of: either serious (mostly) Bible or church issues, with the occasional politics thrown in, or selling books by giving them review publicity. Not that I have ever misled you on a book—I think I’ve called out a few bad ones, and I’ve tried to be honest and not blindly endorse.

But life’s not all about books. It’s not even all about the sermons or the Bible material I do. I actually have other things I like. I like movies. I like fun books. I like sports.

In recent years, though, I’ve realized how much I enjoy cooking. So, I’m going to start blogging about food. Not a whole lot—occasionally on Fridays I’ll write up something I’ve learned or done with food.

Not because I’m an expert, or because it’s earth-shattering. But because it’s a slice of me and my life, and I want to take the occasional personal turn.

I will not tell you I’m running a virtual cooking school, because then you’ll get mad when you get sick from something I do Smile


But I hope you’ll join me. And interact. I’ll even use pictures!

Sermon Recap

Just like Monday rolled around again today, Sunday rolled through yesterday like the University of South Florida moving through Gainesville....